Master the Smoky Eye: Easy 15-Minute Tutorial for Beginners
Advertisements
Master the Smoky Eye: A Step-by-Step Tutorial for Beginners in Under 15 Minutes offers a quick and easy guide to achieving the classic smoky eye look, perfect for makeup novices seeking a stunning transformation in minimal time.
Want to achieve a sultry, smoky eye look but short on time? This tutorial will show you how to Master the Smoky Eye: A Step-by-Step Tutorial for Beginners in Under 15 Minutes, even if you’re a complete makeup beginner.
Advertisements
The Allure of the Smoky Eye
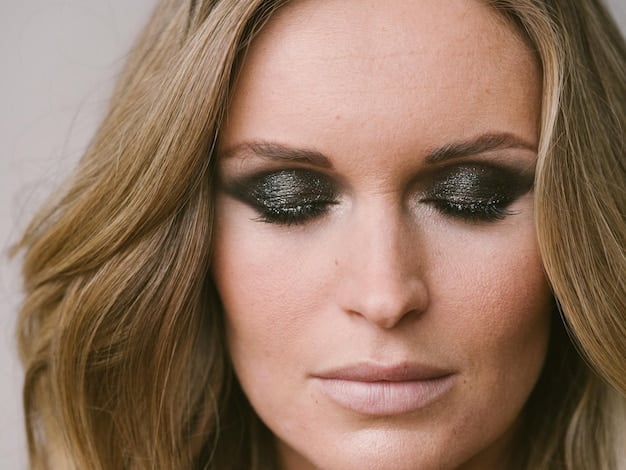
The smoky eye. A classic, captivating look that’s been gracing red carpets and runways for decades. But for many beginners, the thought of creating this dramatic eye makeup can be intimidating. Fear not! It’s simpler than you think.
In this guide, we’ll break down the process, step-by-step, making it achievable for even the most inexperienced makeup enthusiast. Get ready to unlock the secrets to a stunning smoky eye in just minutes!
What Makes a Great Smoky Eye?
A truly great smoky eye isn’t just about smudging dark colors. It’s about creating dimension, blending seamlessly, and enhancing your natural eye shape. Here are key elements:
- Seamless Blending: No harsh lines! The colors should transition smoothly.
- Dimension: Using multiple shades to create depth.
- Placement: Concentrating the darkest colors on the outer corner of the eye for a lifting effect.
- Balance: Ensuring the look complements your skin tone and overall makeup.
A well-executed smoky eye can instantly elevate your look, making you feel confident and glamorous.
Essential Tools and Products
Before we dive into the steps, let’s gather the tools and products you’ll need. Don’t worry, you don’t need a ton of fancy equipment to achieve a beautiful smoky eye.
Keeping things simple and accessible is key when learning. Here’s a list of essentials:
Must-Have Makeup Items
- Eyeshadow Palette: Choose a quad or palette with shades of light brown, medium brown, dark brown or black, and a highlighting shade.
- Eyeshadow Brushes: A blending brush, a shader brush, and a small detail brush.
- Eyeliner: A black eyeliner pencil or gel liner.
- Mascara: Black mascara to add volume and length to your lashes.
- Concealer: To clean up any fallout and brighten the under-eye area.
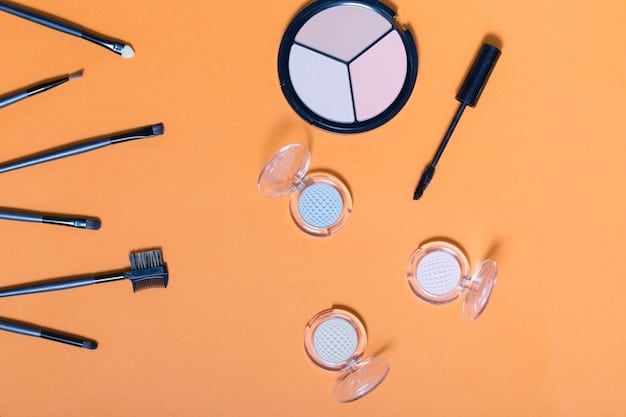
Optionally, you can also include an eyeshadow primer to avoid creasing and to make the eyeshadow last longer.
Prepping Your Lids: The Foundation for Success
Just like a painter preps their canvas, prepping your eyelids is crucial for a smooth and long-lasting smoky eye. This step ensures that your eyeshadow applies evenly and stays put throughout the day or night.
Think of this as creating the perfect base for your masterpiece. Here’s how to do it:
The Importance of Primer
Start with an eyeshadow primer. Apply a thin layer of primer to your eyelids, from your lash line to your brow bone. This will create a smooth surface for your eyeshadow to adhere to.
If you don’t have an eyeshadow primer, you can use a concealer as an alternative. Make sure to set it with a translucent powder to prevent creasing.
Concealer and Setting Powder
- Conceal Imperfections: Apply a small amount of concealer to your eyelids and blend it evenly.
- Set with Powder: Use a fluffy brush to apply a translucent setting powder over the concealer.
- Create a Smooth Base: This step will create a smooth canvas for your eyeshadow application.
Step-by-Step: Achieving the Perfect Smoky Eye
Now for the fun part! The step-by-step guide to creating your mesmerizing smoky eye. Follow these instructions carefully, and you’ll be amazed at how quickly you can achieve this classic look.
Remember, practice makes perfect! Don’t be discouraged if it doesn’t look perfect on your first try.
Step 1: Apply a Transition Shade
Using a fluffy blending brush, apply a light brown or taupe eyeshadow to your crease. This will serve as your transition shade, helping to blend the darker colors seamlessly. Blend the eyeshadow back and forth in a windshield wiper motion.
Step 2: Apply the Darker Shade
Using a shader brush, apply a dark brown or black eyeshadow to your outer corner of your eyelid. Blend the eyeshadow inwards, stopping at the center of your eyelid.
Step 3: Blend, Blend, Blend!
Using a clean blending brush, blend the edges of the darker eyeshadow to soften any harsh lines. This is the most important step in creating a seamless smoky eye. Take your time and blend until the colors transition smoothly.
Step 4: Line Your Eyes
Apply black eyeliner to your upper and lower lash lines. You can create a thin line for a more subtle look, or a thicker line for a more dramatic look. Smudge the eyeliner with a small detail brush to create a smoky effect.
Adding Depth and Dimension
To take your smoky eye to the next level, adding depth and dimension is key. This involves using different shades of eyeshadow to create a more complex and captivating look.
Don’t be afraid to experiment with different colors and textures to find what works best for you.
Highlighting the Inner Corner
Apply a light, shimmery eyeshadow to your inner corner of your eye. This will brighten your eyes and create a more awake and radiant look. You can also apply the same eyeshadow to your brow bone to highlight your eyebrows.
Using Multiple Shades of Eyeshadow
- Start with a Base Shade: Apply a light brown or taupe eyeshadow to your entire eyelid.
- Add Dimension with a Medium Shade: Apply a medium brown eyeshadow to your crease and outer corner of your eyelid.
- Create Depth with a Dark Shade: Apply a dark brown or black eyeshadow to your outer corner of your eyelid.
- Blend Seamlessly: Blend the edges of each eyeshadow shade to create a smooth transition.
Combining different shades of eyeshadow can dramatically improve the results of your smoky eyes.
Finishing Touches and Tips
Once you’ve mastered the basic steps, it’s time to add the finishing touches that will elevate your smoky eye to perfection. These details can make all the difference in achieving a polished and professional look.
Don’t underestimate the power of these small adjustments!
Mascara and Lashes
Apply several coats of black mascara to your upper and lower lashes. This will add volume and length to your lashes, making your eyes look bigger and more defined. You can also add false eyelashes for a more dramatic look.
Cleaning Up Fallout
- Use Concealer to Clean Edges: Apply concealer under your eyes to clean up any eyeshadow fallout and brighten the under-eye area.
- Apply Translucent Powder: Set the concealer with a translucent powder to prevent creasing.
- Blend for a Smooth Finish: Blend the concealer and powder seamlessly into your skin.
The finishing touch is crucial for a perfect smoky eye, so make sure to do it well.
| Key Point | Brief Description |
|---|---|
| 🎨 Blend Seamlessly | Blend eyeshadow edges to soften harsh lines for a professional look. |
| ✨ Highlight Inner Corner | Add a light, shimmery shade to brighten eyes and create a radiant look. |
| 👁️ Apply Mascara Generously | Use multiple coats of black mascara for voluminous and defined lashes. |
| 🧹 Clean Up Fallout | Use concealer to clean up eyeshadow fallout and create a polished finish. |
FAQ
▼
If you don’t have an eyeshadow primer, you can use a concealer as an alternative. Apply a thin layer of concealer to your eyelids and set it with a translucent powder to prevent creasing.
▼
Choose eyeshadow colors that complement your skin tone and eye color. Neutral shades like browns, taupes, and grays are a safe bet for a classic smoky eye. Experiment with different colors to find what works best for you.
▼
Don’t worry if you make a mistake! Use a cotton swab dipped in makeup remover to clean up any errors. You can also use concealer to clean up any eyeshadow fallout and create a sharper line.
▼
To make your smoky eye last longer, start with an eyeshadow primer. Set your eyeshadow with a setting spray. You can also use waterproof eyeliner and mascara to prevent smudging.
▼
Yes, you can create a smoky eye with different colors! Experiment with different color combinations to find what you like best. Burgundy, navy, and green are great alternatives to black for a unique smoky eye look.
Conclusion
Mastering the smoky eye doesn’t have to be a daunting task. By following this step-by-step tutorial, even beginners can achieve a stunning and captivating look in under 15 minutes. Remember to practice, experiment with different shades and techniques, and most importantly, have fun!