Mastering the Cut Crease: Step-by-Step Tutorial for Dramatic Eyes

Advertisements
Mastering the cut crease technique involves using strategic eyeshadow placement to create a defined, eye-catching look, adding depth and dimension to your makeup. This tutorial provides a detailed, step-by-step guide to achieve this dramatic eye effect.
Ready to elevate your eye makeup game? This tutorial will guide you through mastering the cut crease, a technique that creates dramatic, defined eyes.
Advertisements
What is a Cut Crease?
A cut crease is a makeup technique where a contrasting eyeshadow color is applied in the crease of the eye, creating a sharp, defined line. This gives the eyes a more dramatic and sculpted appearance. It’s a fantastic way to add depth and dimension to your look, making your eyes appear larger and more captivating.
This technique isn’t just for the pros! With a little practice and the right tools, anyone can achieve a stunning cut crease. Let’s delve into what makes this technique so special and why it’s worth adding to your makeup repertoire.
The History of the Cut Crease
The cut crease has its roots in vintage makeup styles, particularly the bold, theatrical looks of the 1960s. Iconic figures like Twiggy popularized exaggerated eye makeup, which included defined creases and dramatic lashes. While the technique has evolved, the core principle of creating a distinct separation of color remains.
Why Try a Cut Crease?
The cut crease technique offers several benefits:
- Enhances Eye Shape: It can lift and define the eyes, making them appear larger and more awake.
- Adds Drama: Perfect for special occasions or when you want to make a statement.
- Versatile: Can be adapted to suit different eye shapes and preferences.

Now that you know the basics, let’s dive into the step-by-step tutorial to create your own stunning cut crease!
Tools and Products You’ll Need
Before you start, gather all the necessary tools and products. Having everything within reach will make the process smoother and more enjoyable. Here’s a list of essentials:
Having the right tools is half the battle. Let’s make sure you’re well-equipped!
Essential Brushes
Investing in quality brushes is key for achieving a flawless cut crease:
- Blending Brush: For seamlessly blending eyeshadows together.
- Crease Brush: A smaller, tapered brush for precise color application in the crease.
- Flat Shader Brush: For packing color onto the lid.
Key Makeup Products
Here’s a breakdown of essential makeup products:
- Eyeshadow Primer: To create a smooth base and ensure long-lasting wear.
- Transition Shade: A matte shade that blends seamlessly into your skin tone.
- Crease Color: A darker shade for defining the crease.
- Lid Color: A lighter, shimmer or matte shade for the eyelid.
- Concealer: For cleaning up the cut crease line.
- Eyeliner: To further define the eyes.
- Mascara: To complete the look.
Having these products ready allows you to achieve a professional, polished result!
Step-by-Step Cut Crease Tutorial
Now for the fun part! Follow these steps to create a captivating cut crease.
Ready to create a stunning cut crease? Let’s get started with our step-by-step guide!
Step 1: Prep Your Eyes
Begin by applying an eyeshadow primer to your eyelids. This creates a smooth base and helps your eyeshadow last longer.
Step 2: Apply Transition Shade
Using a blending brush, apply a transition shade slightly above your natural crease. Blend well to create a seamless transition.
Step 3: Define the Crease
With a crease brush, apply a darker eyeshadow shade into your crease. Start from the outer corner and work your way inwards, following the natural shape of your eye socket. Blend the color gently to avoid harsh lines. Using a windshield wiper motion can give great results here.
- Tip: Build the color gradually to achieve your desired intensity.
- Tip: Use small, controlled strokes for precise application.
- Tip: Remember to blend, blend, blend!
Perfecting these first few steps really sets the stage to ensure the cut crease stands out!
Creating the Perfect Cut
This is where the magic happens! Creating the cut involves precision and patience.
The cut is the heart of the whole operation!
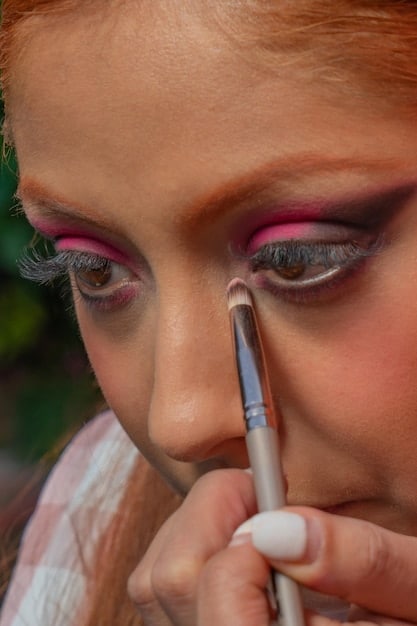
Step 4: Carve Out the Crease
Using a flat brush and concealer, carefully carve out the crease. Follow the natural curve of your eye socket, creating a sharp, defined line. Be precise and take your time.
Step 5: Apply Lid Color
Once the concealer is set, apply your chosen lid color to the area you’ve carved out. Press the color onto the lid using a flat shader brush.
Step 6: Blend and Refine
Use a clean blending brush to soften the edges of the crease color and lid color. Blend gently to create a seamless transition between the two shades.
Refining and blending the lines between the concealer and the shade is the final touch of artistry
Adding Finishing Touches
Now that you’ve mastered the cut crease, it’s time to add the finishing touches.
Now is the time to really make the eyes pop even more.
Step 7: Apply Eyeliner
Apply your favorite eyeliner to further define your eyes. You can create a classic winged liner or opt for a more subtle line.
Step 8: Apply Mascara
Finish off the look with several coats of mascara. This will add volume and length to your lashes, completing the dramatic eye makeup.
Tips for Different Eye Shapes
The cut crease technique can be adapted to suit different eye shapes.
The great thing about makeup is that it is so versatile and can be adapted to different eye shapes!
Hooded Eyes
For hooded eyes, create a higher crease to make the eyes appear more open.
Here are a few extra tips for hooded eyes to ensure the cut crease is just right!
- Technique: Extend the cut above your natural crease for better visibility.
- Product Choice: Use matte shades to avoid accentuating the hood.
Almond Eyes
Almond eyes can rock any cut crease style. Experiment with different colors and placements.
Because almond eyes are so versatile, there are so many options to explore!
- Technique: Try a halo eye cut crease to enhance the natural shape.
- Color Choice: Experiment with bold and vibrant colors.
Conclusion
Mastering the cut crease technique can seem daunting, but with practice and the right tools, you’ll be creating stunning eye looks in no time. Remember to have fun and experiment with different colors and styles to find what works best for you.
| Key Step | Brief Description |
|---|---|
| ✨ Prep the Eyes | Apply eyeshadow primer for a smooth base. |
| 🎨 Define the Crease | Use a darker eyeshadow in your crease, blending well. |
| 🔪 Carve the Cut | Apply concealer to sharpen the crease line. |
| 💫 Add Lid Color | Apply a lighter shade to the eyelid. |
FAQ
What is the main purpose of a cut crease makeup look?
▼
The main purpose is to create definition and add depth to the eyes, making them appear larger and more dramatic by contrasting eyeshadow colors in the crease.
▼
Essential brushes include a blending brush for seamless color transitions, a crease brush for precise application, and a flat shader brush for packing color onto the lid.
▼
Yes, it’s versatile and can be adapted. For hooded eyes, create a higher crease; for almond eyes, experiment with different colors and placements to enhance their natural shape.
▼
Applying eyeshadow primer creates a smooth base, ensuring that the eyeshadow lasts longer without creasing or fading. It also helps the colors appear more vibrant.
▼
Use a a clean blending brush in windshield wiper motions to soften the edges of the crease and lid eye shadows to avoid harsh lines.
Conclusion
By following these steps and tips, you can master the cut crease and create stunning, dramatic eye makeup looks. The key is practice and experimentation, so don’t be afraid to try different colors and techniques. Have fun with it and let your creativity shine!