Advanced Eyeshadow Blending: Pro Secrets for Current Trends
Advertisements
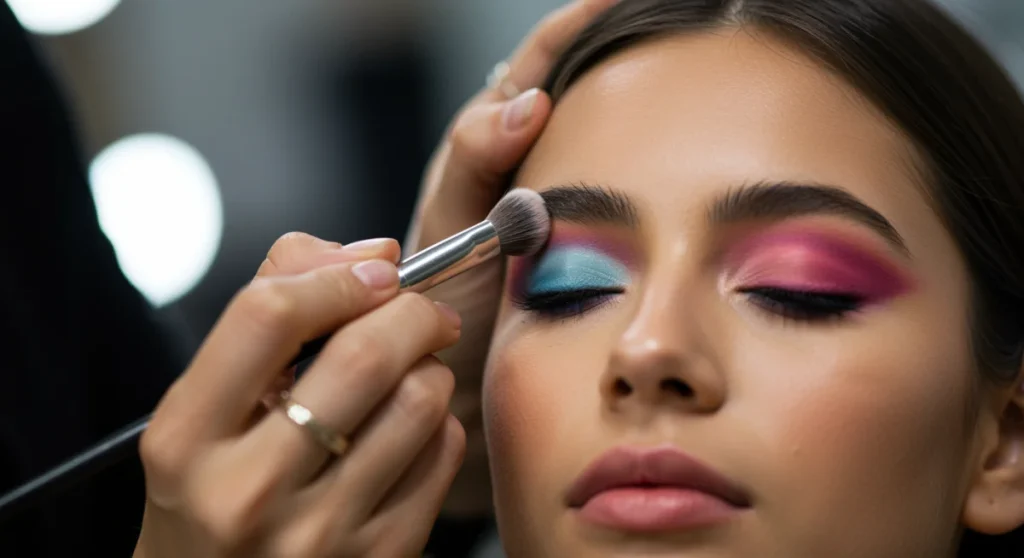
Mastering advanced eyeshadow blending is crucial for achieving professional and trend-forward makeup looks, requiring precise techniques beyond basic application to create seamless transitions and captivating depth.
Advertisements
Are you ready to transform your eye makeup from good to absolutely stunning? Moving beyond the basics: 4 advanced eyeshadow blending secrets from pro artists for current trends is essential for anyone looking to truly elevate their beauty routine. Forget patchy applications and harsh lines; it’s time to unlock the secrets that professional makeup artists use to create flawless, captivating looks that are perfectly in sync with today’s hottest trends.
Advertisements
Understanding the Foundation: Why Blending Matters
Blending is often hailed as the most critical step in eyeshadow application, yet it’s frequently misunderstood or rushed. It’s not just about softening edges; it’s about creating a harmonious transition between colors, building depth, and ensuring your eye makeup looks polished and intentional. Without proper blending, even the most expensive eyeshadows can appear amateurish, undermining the overall impact of your look.
The art of blending allows for a seamless gradient from one shade to another, making the colors appear as if they melt into each other. This technique is especially vital when working with multiple colors or creating complex looks like smoky eyes or cut creases. A well-blended eyeshadow look enhances the natural shape of your eye, brings out the color of your irises, and provides a sophisticated finish that truly stands out.
The science of smooth transitions
Achieving a smooth transition involves understanding color theory and the properties of different eyeshadow formulas. Powder shadows, for instance, require a different blending approach than creams or liquids. The goal is always to diffuse the pigment evenly, preventing any harsh lines from forming. This diffusion creates an illusion of depth and dimension, making the eyes appear larger and more expressive.
- Pigment Diffusion: Evenly spreading color for a soft, gradual effect.
- Color Harmony: Selecting shades that complement each other for a cohesive look.
- Layering Technique: Building up color gradually to avoid patchiness.
Tools of the trade: brushes and their purpose
The right tools are just as important as the technique itself. A variety of blending brushes, each designed for a specific purpose, can make a significant difference. Fluffy, dome-shaped brushes are ideal for all-over blending, while smaller, more precise brushes are perfect for detailed work in the crease or outer corner. Understanding which brush to use for each step is fundamental to achieving professional results.
Ultimately, a solid foundation in blending ensures that your eye makeup not only looks beautiful but also lasts longer. When colors are properly blended, they adhere better to the skin and are less likely to crease or fade throughout the day. This attention to detail is what separates a good makeup application from an exceptional one, making blending an indispensable skill for any makeup enthusiast.
Secret 1: The ‘Invisible Layer’ Technique for Seamless Gradients
The ‘Invisible Layer’ technique is a game-changer for achieving truly seamless eyeshadow gradients, making it one of the most powerful advanced eyeshadow blending secrets. Instead of simply packing on color and trying to blend it out, this method focuses on building up intensity through extremely thin, almost transparent layers. This approach allows for greater control over the depth and transition of colors, resulting in a flawless, airbrushed finish that appears effortlessly professional.
This technique is particularly effective for looks that require a gradual shift from a light shade to a dark one, or when incorporating multiple colors that need to flow into each other without any visible lines. It prevents the common issue of muddy-looking eyeshadow, where colors blend together too much and lose their individual vibrancy. The key is patience and a light hand, ensuring each layer is almost imperceptible on its own.
Mastering the sheer application
To execute the invisible layer technique, begin with a very small amount of product on your brush. Tap off any excess to ensure you’re working with a minimal amount of pigment. Apply this sheer layer to the desired area, focusing on the edges you want to soften. Use light, circular, or windshield-wiper motions to gently blend the color. The initial application should be so light that it barely registers on the skin.
- Light Hand: Use minimal pressure to avoid harsh lines.
- Small Amounts: Apply tiny quantities of eyeshadow at a time.
- Gradual Building: Increase color intensity slowly with each layer.
Layering for depth and dimension
Once the first sheer layer is applied and blended, repeat the process with the same or a slightly darker shade. Continue to build up the color in thin layers, progressively adding more pigment to the areas where you want the most intensity. This gradual layering allows you to control the depth of the color precisely, ensuring a smooth transition between shades. It’s like painting with watercolors, where each stroke contributes to the overall masterpiece without overpowering the previous one.
The beauty of the invisible layer technique lies in its ability to create a soft, diffused look that is incredibly flattering. It’s especially useful for current trends that favor ethereal, multi-dimensional eye makeup, where the focus is on subtle shifts in color rather than stark contrasts. This method also helps to prevent fallout and creasing, as you’re not overloading the eyelid with too much product at once. By mastering this advanced blending secret, you’ll achieve a level of sophistication in your eye makeup that truly stands out.
Secret 2: The ‘Reverse Blending’ Method for Crisp Edges
For those seeking impeccably crisp edges and defined shapes in their eyeshadow, the ‘Reverse Blending’ method is an indispensable advanced eyeshadow blending secret. While traditional blending focuses on diffusing color outwards, reverse blending works by refining the outer boundaries of your eyeshadow after the primary application. This technique is particularly valuable for creating sharp cut creases, graphic liner effects with shadow, or any look that demands precise lines and clean separation between colors or skin.
Often, even with careful application, the outer edges of eyeshadow can appear slightly diffused or less defined than desired. Reverse blending addresses this by using a clean brush and a strategic touch to ‘carve out’ the desired shape. It’s about subtraction rather than addition, cleaning up and sharpening the perimeter of your shadow work to achieve a polished, professional finish.
Defining with a clean brush
To execute reverse blending, first complete the majority of your eyeshadow application, including all your primary blending. Once your colors are laid down and blended to your satisfaction, take a clean, flat, and somewhat dense brush. This brush should have no product on it whatsoever. Gently press the edge of this clean brush along the line where you want a crisp definition. Use short, light, sweeping motions, moving inwards towards the blended shadow, to push any stray pigment back into the main color area or to lift it slightly.
- Clean Brush: Essential for precise cleanup, free of any product.
- Gentle Pressure: Avoid harsh scrubbing to prevent disturbing existing makeup.
- Inward Motion: Sweep towards the shadow to refine edges, not away from them.
Utilizing concealer for ultimate sharpness
For an even sharper edge, especially for cut creases or graphic designs, you can incorporate a small amount of concealer or a skin-toned eyeshadow. Dip a very fine, flat brush into a matte concealer that matches your skin tone or is slightly lighter. Carefully trace along the desired edge of your eyeshadow. This acts like an eraser, cleaning up any imperfections and creating an incredibly sharp line. Once applied, gently tap the edges of the concealer with your finger or a clean brush to blend it seamlessly into your skin, without touching the eyeshadow.
The reverse blending method is a powerful tool for achieving modern, architectural eye looks that are currently trending. It allows for intentional contrast and precise artistry, transforming a soft blend into a defined statement. By mastering this technique, you gain the ability to sculpt your eyeshadow with unparalleled precision, ensuring your finished look is sharp, clean, and undeniably professional. It’s a testament to the idea that sometimes, less is more, especially when it comes to refining your artistry.
Secret 3: The ‘Buffer Shade’ Strategy for Effortless Transitions
The ‘Buffer Shade’ strategy is an ingenious advanced eyeshadow blending secret employed by professionals to create effortlessly smooth and harmonious transitions between disparate colors. This technique involves introducing a neutral, mid-tone shade between two contrasting or intensely pigmented colors. The buffer shade acts as a bridge, softening the visual impact of the transition and making the blending process significantly easier and more forgiving. It’s particularly useful when working with bold colors or when you want to ensure a gradient looks natural and not abrupt.
Imagine trying to blend a deep blue directly into a bright yellow – the result can often be a muddy green or a harsh line. A buffer shade, such as a warm brown, a soft taupe, or even a muted peach, can be applied in the transition area first. This creates an intermediary layer that allows the blue and yellow to blend into the buffer shade, rather than directly into each other, resulting in a cleaner and more artistic gradient.
Choosing the right buffer shade
Selecting the appropriate buffer shade is crucial for the success of this technique. The ideal buffer shade should be a matte color that is neither too dark nor too light, and it should complement the undertones of the main colors you are using. For warm-toned looks, a warm brown or orange-based neutral works well. For cooler tones, a taupe or a soft grey can be more effective. The goal is for the buffer shade to subtly bridge the gap, not to become a prominent color itself.
- Neutral Tones: Opt for matte browns, taupes, or muted peaches.
- Complementary Undertones: Match the buffer to the overall color scheme.
- Mid-Tone Intensity: Avoid shades that are too dark or too light for the transition.
Application for seamless flow
Begin by applying your primary eyeshadows as usual, leaving a small gap or a less intense area where the buffer shade will go. Then, using a fluffy blending brush, apply a small amount of your chosen buffer shade directly into this transition zone. Use gentle, circular motions to blend the buffer shade into both of the adjacent colors. This will soften any harsh lines and create a continuous, flowing effect. The buffer shade acts as a sort of ‘primer’ for the blend, making the subsequent blending of the main colors much smoother.
The buffer shade strategy is a testament to the nuanced approach professionals take to color application. It simplifies complex blends and ensures that even the most daring color combinations appear cohesive and polished. By incorporating this secret into your routine, you’ll find that achieving those elusive, perfectly blended eyeshadow looks becomes significantly more attainable, enhancing the overall artistry and sophistication of your makeup.
Secret 4: ‘Spot Blending’ for Precision and Detail
The ‘Spot Blending’ technique is a highly specialized advanced eyeshadow blending secret, focusing on meticulous detail and localized diffusion rather than broad strokes. Unlike sweeping blending motions that cover larger areas, spot blending involves using very small, precise brushes to blend tiny sections of eyeshadow. This method is indispensable for intricate eye looks, such as detailed inner corner highlights, precise lower lash line smoking, or when refining small areas of a cut crease. It ensures that every element of your eye makeup is perfectly diffused without disturbing adjacent, already-placed colors.
Often, when attempting to blend small areas with a large brush, the color can spread beyond the intended zone, leading to a messy or undefined look. Spot blending bypasses this issue by allowing you to target specific, minute areas, creating a soft focus only where it’s needed. This level of control is what truly elevates an eye look from good to exceptional, showcasing a high degree of artistry and attention to detail.
Choosing the right tools for precision
For effective spot blending, the choice of brush is paramount. You’ll need an array of very small, dense, and often pointed or pencil-shaped brushes. These brushes are designed to pick up and deposit a concentrated amount of product in a tiny area, and then to diffuse it with minimal spread. Think of brushes typically used for smudging eyeliner or adding detail to the outer V of the eye. Having a variety of shapes and sizes allows for versatility in tackling different small areas.
- Pencil Brushes: Ideal for smudging and precise blending in tight spaces.
- Small Detail Brushes: Perfect for inner corner work and lower lash line.
- Dense, Flat Brushes: Useful for pressing and blending small amounts of glitter or shimmer.
Targeted application and diffusion
To perform spot blending, load a tiny amount of eyeshadow onto your chosen small brush. Gently press the brush onto the specific spot you wish to blend or diffuse. Then, using very small, controlled circular or back-and-forth motions, gently work the product into the skin or into the adjacent color. The key is to keep the movement extremely localized, ensuring the blending action only affects the immediate area. This technique requires a steady hand and a light touch, building up the blend gradually rather than trying to achieve it in one go.
Spot blending is particularly crucial for current trends that feature intricate designs, multi-faceted glitter applications, or highly defined lower lash lines. It allows artists to achieve a refined finish that is impossible with larger blending brushes. By mastering this advanced technique, you gain the ability to add nuanced depth and incredible precision to every aspect of your eye makeup, ensuring a truly polished and professional result that captures attention.
Integrating Advanced Blending into Current Makeup Trends
Understanding advanced eyeshadow blending techniques is one thing, but successfully integrating them into current makeup trends is where true artistry shines. Today’s beauty landscape is dynamic, favoring looks that range from soft glam to graphic artistry, and each trend benefits immensely from precise and thoughtful blending. These advanced secrets are not just about technical skill; they’re about applying that skill to create looks that are relevant, modern, and captivating.
For instance, the currently popular ‘foxy eye’ or ‘siren eye’ trends rely heavily on crisp, elongated outer corners, which are perfectly achieved using the ‘Reverse Blending’ method. Similarly, the ethereal, multi-dimensional eye looks seen on social media, often featuring multiple soft shades, are elevated by the ‘Invisible Layer’ technique, ensuring seamless color transitions and a weightless feel.
Adapting techniques for popular styles
When approaching trends like monochromatic looks or vibrant color blocking, the ‘Buffer Shade’ strategy becomes invaluable. It allows you to introduce depth and a smooth transition even within a single color family or between bold, contrasting hues, preventing any harsh lines or muddiness. For more intricate trends that involve glitter placement or detailed inner corner work, ‘Spot Blending’ ensures that these delicate elements are perfectly diffused and integrated without overwhelming the rest of the eye makeup.
- Soft Glam: Utilize ‘Invisible Layer’ for diffused, subtle gradients.
- Graphic Liner/Cut Crease: ‘Reverse Blending’ is essential for sharp, defined lines.
- Vibrant Color Blocking: Employ ‘Buffer Shade’ to create harmonious transitions between bold colors.
- Detailed Inner Corner/Lower Lash: ‘Spot Blending’ provides precision for intricate areas.
The synergy of trends and technique
The beauty of these advanced blending secrets lies in their versatility. They aren’t confined to one specific look but rather serve as foundational skills that can be adapted and combined to achieve virtually any trending eye makeup style. By understanding how each technique contributes to different aspects of a look – whether it’s seamlessness, sharpness, or harmonious transitions – you empower yourself to recreate and even innovate beyond what you see online.
Ultimately, staying current with makeup trends means more than just knowing what colors or styles are popular. It means understanding the underlying techniques that make those trends look polished and professional. By mastering these advanced eyeshadow blending secrets, you’ll not only be able to replicate current trends with ease but also develop the confidence to experiment and create your own unique, trend-setting eye makeup looks that truly stand out.
Troubleshooting Common Blending Challenges
Even with advanced techniques, blending eyeshadow can present its own set of challenges. Understanding how to troubleshoot common issues is a crucial part of mastering the art of eye makeup. From patchy application to muddy colors, these problems often stem from incorrect product application, brush choice, or technique. Addressing these issues on-head ensures that your efforts result in a flawless, professional finish, rather than a frustrating experience.
One of the most frequent complaints is patchy eyeshadow, where color appears unevenly distributed. This can often be remedied by ensuring you’re working with a properly primed eyelid and applying eyeshadow in thin, buildable layers, as championed by the ‘Invisible Layer’ technique. Another common issue is colors appearing muddy, especially when blending multiple shades. This usually indicates either too much product, insufficient cleaning of brushes between colors, or an incorrect blending order.
Addressing patchiness and fallout
Patchiness can often be resolved by using a good quality eyeshadow primer to create an even base for your shadows. Additionally, always tap off excess product from your brush before applying. If patchiness occurs during blending, try using a clean, fluffy brush with no product to gently buff out the uneven areas. For fallout, which is when eyeshadow dust falls onto your cheeks, try applying your eye makeup before your face makeup, or hold a tissue under your eye during application. Pressing shadows onto the lid rather than sweeping can also minimize fallout.
- Primer Use: Creates an even base for smooth application.
- Tapping Excess: Prevents overloading the brush and patchy results.
- Clean Buffing Brush: Corrects uneven areas without adding more product.
Preventing muddy colors and harsh lines
To prevent colors from turning muddy, incorporate the ‘Buffer Shade’ strategy, especially when blending contrasting hues. Always clean your blending brushes between using different colors, or use separate brushes for each shade to avoid mixing pigments unnecessarily. When blending, focus on the transition areas with light, circular motions, rather than scrubbing back and forth across the entire lid. If a harsh line appears, take a clean, soft blending brush and gently buff along the edge until it softens. The ‘Reverse Blending’ technique can also be used post-application to refine any unwanted harshness, using a clean brush or a small amount of concealer to sharpen edges.
Mastering troubleshooting techniques is just as important as learning the initial blending methods. It allows for correction and refinement, turning potential mistakes into opportunities for perfection. By understanding these common blending challenges and knowing how to overcome them, you can approach your eye makeup with greater confidence, ensuring a consistently polished and professional result every time you pick up a brush.
Maintaining Your Blending Tools for Optimal Performance
The effectiveness of your advanced eyeshadow blending techniques is inextricably linked to the condition of your blending tools. Professional makeup artists understand that clean, well-maintained brushes are not just a matter of hygiene, but a crucial component for achieving flawless results. Neglecting your brushes can lead to patchy application, muddy colors, and even skin irritation, undermining all your efforts to create a stunning eye look. Proper maintenance ensures your brushes perform optimally, extending their lifespan and making your blending process smoother and more efficient.
Dirty brushes accumulate old makeup, oils, and bacteria, which can transfer to your eyelids, leading to breakouts or infections. Furthermore, residual product on brush bristles can interfere with new color application, making it difficult to achieve clean, vibrant, and seamlessly blended looks. A well-cared-for brush will pick up and distribute pigment more evenly, allowing for a more controlled and precise application, which is essential for advanced blending techniques.
Regular cleaning routines
Establishing a regular cleaning routine for your brushes is paramount. For daily use, a quick spot clean with a brush cleanser spray after each application can remove surface makeup and sanitize the bristles. However, a deeper wash with a gentle shampoo or specialized brush soap is necessary at least once a week, especially for brushes used with cream or liquid products. This deep clean removes built-up product, oils, and bacteria from the core of the bristles.
- Spot Clean Daily: Use a quick-drying brush cleanser after each use.
- Deep Clean Weekly: Wash with gentle soap and water for thorough sanitization.
- Air Dry Properly: Lay brushes flat or hang upside down to maintain shape and prevent water damage.
Proper storage and care
Beyond cleaning, how you store and care for your brushes also impacts their performance and longevity. Always ensure brushes are completely dry before storing them to prevent mold and mildew growth. Store them in a brush roll, cup, or drawer where they are protected from dust and damage. Avoid storing them bristles-down in a container if they are still damp, as this can trap moisture and damage the ferrule (the metal part that connects the bristles to the handle).
Investing in good quality blending brushes is worthwhile, but their value is only realized through consistent care. By dedicating time to maintaining your tools, you ensure they remain soft, effective, and hygienic, ready to help you execute every advanced eyeshadow blending secret with precision and ease. This commitment to tool care is a hallmark of any truly skilled makeup artist, ensuring that every application is as perfect as possible.
| Key Technique | Brief Description |
|---|---|
| Invisible Layer | Builds color intensity through sheer layers for seamless, airbrushed gradients. |
| Reverse Blending | Refines outer eyeshadow edges with a clean brush or concealer for crisp lines. |
| Buffer Shade | Uses a neutral mid-tone to bridge and soften transitions between contrasting colors. |
| Spot Blending | Targets tiny sections with small brushes for precise diffusion in intricate areas. |
Frequently asked questions about advanced eyeshadow blending
The most common mistake is applying too much product at once, leading to muddy colors and patchy results. Advanced blending relies on building up thin, sheer layers, allowing for greater control and smoother transitions between shades, preventing an amateurish appearance.
To prevent creasing, always start with an eyeshadow primer to create an even base and enhance longevity. Additionally, apply eyeshadow in thin layers, setting cream products with powder. Proper blending also ensures the product adheres better, reducing creasing.
While possible, it’s not ideal for advanced blending. Using different brushes for different colors or stages of blending (e.g., a clean brush for softening edges) prevents muddiness and ensures cleaner transitions. A variety of brush shapes and sizes is recommended.
Matte powder eyeshadows are generally the easiest to blend for creating seamless gradients and building depth. However, cream and liquid formulas can also be blended expertly with the right tools and techniques, often requiring quicker blending due to their faster drying times.
Your eyeshadow is properly blended when there are no harsh lines or visible demarcation between colors. The transition from one shade to another should appear smooth and effortless, as if the colors melt into each other, creating a soft, diffused effect.
Conclusion
Mastering advanced eyeshadow blending is more than just a technique; it’s an art form that transforms your makeup application into a professional-level skill. By delving into the ‘Invisible Layer’ for seamless gradients, ‘Reverse Blending’ for crisp edges, the ‘Buffer Shade’ for harmonious transitions, and ‘Spot Blending’ for intricate details, you unlock the ability to create eye looks that are not only beautiful but also perfectly aligned with current beauty trends. These secrets, combined with proper tool maintenance and troubleshooting knowledge, empower you to move beyond the basics and achieve truly captivating, polished results. Embrace these advanced methods, and watch your eye makeup artistry reach new heights, reflecting confidence and unparalleled skill.


