The Ultimate Guide to Eyeliner: Long-Lasting Wings Tutorial
Advertisements
The Ultimate Guide to Eyeliner provides a comprehensive makeup tutorial, teaching you how to achieve flawless, long-lasting winged eyeliner that enhances your eyes and completes your look all day.
Want to achieve the perfect winged eyeliner that lasts all day? The Ultimate Guide to Eyeliner: A Makeup Tutorial for Wings That Last All Day will walk you through every step, from choosing the right product to mastering the application technique.
Advertisements
Eyeliner Essentials: Choosing the Right Products
Selecting the correct eyeliner and tools is crucial for achieving a long-lasting, perfect wing. Different eyeliners offer varying finishes and application styles, so understanding your options is key. Let’s explore the best products for creating stunning eyeliner looks.
Types of Eyeliner
Each type of eyeliner has its own unique benefits. Gel liners are known for their smooth application and intense color payoff. Liquid liners provide precision and are perfect for creating sharp wings. Pencil liners are great for beginners and can be used to create a smudged or smoky look.
Essential Tools for Eyeliner Application
Having the right tools can make a significant difference in your eyeliner application. Angled brushes are ideal for applying gel liner with precision. Eyeliner stencils can help create symmetrical wings. Cotton swabs are perfect for cleaning up any mistakes.
- Gel Eyeliner: Offers a smooth, creamy application for bold lines.
- Liquid Eyeliner: Provides precision and is ideal for sharp, defined wings.
- Pencil Eyeliner: Versatile for creating both soft and defined lines, suitable for beginners.
When selecting your eyeliner, consider your skin type and desired look. Oily eyelids may benefit from waterproof formulas to prevent smudging. Experiment with different types to find the product that works best for you. By choosing the right eyeliner and tools, you’re setting the foundation for a long-lasting, perfect wing.
Preparing Your Eyes: Priming for Perfection
Proper preparation ensures your eyeliner stays put all day. Priming and setting your eyelids creates a smooth canvas and prevents creasing. This step is particularly important for those with oily eyelids. Let’s explore how to prime your eyes for eyeliner perfection.
Importance of Eye Primer
Eye primer is essential for creating a smooth base and preventing your eyeliner from smudging or fading. It helps to control oil production and provides a grip for your eyeliner, ensuring it stays in place throughout the day. A good eye primer can significantly extend the wear time of your eyeliner.
Start by cleansing your eyelids with a gentle cleanser to remove any oil or makeup residue. Then, apply a thin layer of eye primer to your entire eyelid, from lash line to brow bone. Allow the primer to dry completely before moving on to the next step.
Setting your eye primer with a translucent powder further enhances its effectiveness. Use a fluffy brush to lightly dust the powder over your primed eyelids. This step helps to absorb any excess oil and creates an even smoother surface for your eyeliner application.
By properly preparing your eyes, you’re creating the perfect canvas for your eyeliner application. Taking the time to prime and set your eyelids can make a significant difference in the longevity and appearance of your eyeliner. This is a crucial step for achieving a long-lasting, flawless look.
Mastering the Wing: Step-by-Step Application
Creating the perfect wing can seem daunting, but with practice and the right technique, anyone can master it. This step-by-step guide will walk you through the process of creating a symmetrical, sharp wing that enhances your eyes. Let’s dive into the art of winged eyeliner.
Starting with the Outline
Begin by creating a light outline of your wing. Use a pencil eyeliner or a fine-tipped liquid liner to sketch the shape of your wing. Start at the outer corner of your eye and extend the line upward towards the end of your eyebrow. The angle of the wing should complement your eye shape.
Once you’re happy with the angle and length of your wing, connect the end of the wing to your upper lash line. Fill in the outline with your chosen eyeliner, creating a solid, even line. Use short, controlled strokes to ensure a smooth application.
For a more dramatic wing, you can thicken the line along your upper lash line. Start thin at the inner corner of your eye and gradually increase the thickness as you move towards the outer corner. This technique creates a balanced, eye-catching look.
Tips for Symmetry
Achieving symmetrical wings requires patience and a steady hand. Use a mirror to check the angle and length of your wings from different perspectives. If you notice any discrepancies, use a cotton swab dipped in makeup remover to make adjustments.
- Start with a Light Outline: Use a pencil or fine-tipped liquid liner to sketch the shape of your wing before filling it in.
- Use Short, Controlled Strokes: Apply your eyeliner in short, controlled strokes to ensure a smooth and even application.
- Check Symmetry Regularly: Use a mirror to check the angle and length of your wings from different perspectives.
Mastering the winged eyeliner technique takes time and practice. Don’t be discouraged if your wings aren’t perfect at first. Keep practicing and experimenting with different techniques until you find what works best for you. With patience and persistence, you’ll be creating flawless wings in no time.
Correcting Mistakes: Quick Fixes for Eyeliner Fails
Even the most experienced makeup artists make mistakes. Knowing how to quickly and effectively correct eyeliner errors can save you time and frustration. Let’s explore some common mistakes and how to fix them.
Using Cotton Swabs and Makeup Remover
Cotton swabs and makeup remover are your best friends when it comes to correcting eyeliner mistakes. Dip a cotton swab in makeup remover and gently erase any smudges or uneven lines. Use a clean cotton swab to blend the edges for a seamless finish.
Layering Eyeshadow for Coverage
If you make a more significant mistake, you can use eyeshadow to cover it up. Choose an eyeshadow color that matches your eyeliner and apply it over the mistake with a small, angled brush. This technique can help to create a more even and blended look.
Another great trick is to use concealer to clean up the edges of your wings. Apply a small amount of concealer to an angled brush and trace the edge of your wing, creating a sharp, defined line. This technique can instantly elevate your eyeliner look.
Making mistakes is a natural part of the learning process. Don’t be afraid to experiment and try new things. With practice and the right techniques, you’ll become a pro at correcting eyeliner errors. Remember, makeup is all about having fun and expressing yourself.
Setting Your Eyeliner: Ensuring All-Day Wear
Setting your eyeliner is essential for ensuring it lasts all day without smudging or fading. There are several techniques you can use to set your eyeliner and keep it looking fresh from morning to night. Let’s explore the best methods for achieving long-lasting eyeliner.
Using Eyeshadow to Set Eyeliner
Applying a thin layer of eyeshadow over your eyeliner can help to set it and prevent smudging. Choose an eyeshadow color that matches your eyeliner and use a small, angled brush to gently pat it over the eyeliner. This technique creates a seal that helps to prolong the wear time of your eyeliner.
Applying Setting Spray
Setting spray is another effective way to keep your eyeliner in place. Close your eyes and mist setting spray over your entire face, including your eyelids. The setting spray will help to lock in your eyeliner and prevent it from budging throughout the day.
- Choose the Right Formula: Opt for waterproof or long-wearing eyeliner formulas for maximum staying power.
- Layer Eyeshadow: Pat a matching eyeshadow over your eyeliner to set it and prevent smudging.
- Use Setting Spray: Mist setting spray over your face to lock in your eyeliner and keep it in place all day.
By setting your eyeliner properly, you can enjoy a flawless, long-lasting look that lasts from morning to night. Experiment with different techniques to find the method that works best for you. With the right approach, you can confidently rock your eyeliner all day long.
Different Eyeliner Styles: Exploring Beyond the Wing
While winged eyeliner is a classic and popular choice, there are many other eyeliner styles to explore. Experimenting with different styles can help you find new ways to enhance your eyes and express your personal style. Let’s take a look at some alternative eyeliner looks.
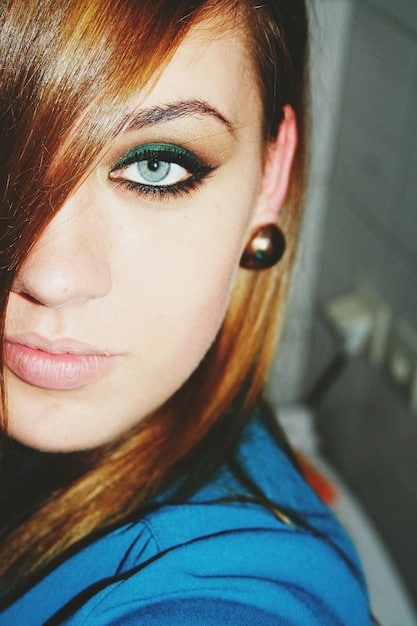
Classic Winged Eyeliner
The classic winged eyeliner is a timeless look that can be adapted to suit any eye shape. To create this look, start by drawing a thin line along your upper lash line, gradually thickening the line as you move towards the outer corner. Extend the line upward at a 45-degree angle to create the wing.
Smudged Eyeliner
For a softer, more natural look, try smudged eyeliner. Apply a pencil eyeliner along your upper and lower lash lines, then use a cotton swab or blending brush to smudge the lines. This technique creates a smoky, effortless look that’s perfect for everyday wear.
Graphic Eyeliner
If you’re feeling adventurous, try graphic eyeliner. This style involves creating bold, geometric shapes with your eyeliner. Use a fine-tipped liquid liner to draw graphic lines along your upper and lower lash lines. Get creative and experiment with different shapes and colors.
Exploring different eyeliner styles can help you discover new ways to enhance your eyes and express your personal style. Don’t be afraid to experiment and try new things. Makeup is all about having fun and expressing your creativity. With a little practice, you can master any eyeliner style and create stunning looks that reflect your unique personality.
| Key Point | Brief Description |
|---|---|
| ✨ Product Selection | Choose the right eyeliner type (gel, liquid, pencil) and essential tools for precise application. |
| 👁️ Eye Preparation | Prime eyelids to create a smooth canvas, prevent smudging, and extend eyeliner wear time. |
| ✍️ Wing Mastery | Outline the wing, connect to the lash line, and use short strokes for a smooth, symmetrical application. |
| 🛡️ Setting Techniques | Set eyeliner with eyeshadow and setting spray to ensure it lasts all day without smudging. |
FAQ
▼
Pencil eyeliner is generally recommended for beginners due to its ease of use and blendability. It allows for mistakes to be easily corrected and is perfect for creating soft, smudged looks.
▼
To prevent smudging, start with an eye primer, use a waterproof eyeliner, and set it with eyeshadow. Avoid touching your eyes throughout the day to keep your eyeliner in place.
▼
Start with a light outline to map out the shape of your wing before filling it in. Use short, controlled strokes and check the symmetry regularly in a mirror to ensure both sides match.
▼
Yes, eyeshadow can be used as eyeliner. Apply it with a damp, angled brush for a more intense color payoff. This technique is great for creating a softer, more natural look.
▼
Black eyeliner is a classic choice that suits most skin tones. However, brown eyeliner can be a softer alternative for fair skin. Experiment with different colors to find what complements your skin best.
Conclusion
Mastering the art of eyeliner, especially achieving those perfect, long-lasting wings, takes practice and patience. By following this comprehensive guide, from selecting the right products and preparing your eyes to mastering the application techniques and setting your eyeliner, you’ll be well on your way to creating stunning eyeliner looks that last all day. Don’t be afraid to experiment with different styles and techniques to find what works best for you, and remember, practice makes perfect!


